

How To Link Files In Mustache Template
Templates are a groovy fashion to split your website's code from its design. There are many great web template systems bachelor for different languages and platforms, including Smarty for PHP and the Django template language for Python.
In this tutorial you'll explore Mustache, a relatively new and very simple template system that you can easily utilize to create HTML templates. Yous'll wait at diverse topics, including:
- The advantages of using Mustache
- How to install and use the Mustache processor
- How Mustache tags, variables, and data objects work
- Using sections to create conditions and loops
- Including one Mustache template within another
- …and lots more than!
Along the fashion, you'll see enough of code examples that show you how Mustache works. At the cease of the tutorial, there'southward a complete example that uses Mustache, along with jQuery, to create a uncomplicated Ajax-based product list page.
What is Mustache?
Mustache is a unproblematic template system that you can utilise when building websites and web apps. By using a template system, you lot tin can go on your dorsum-cease code separate from the markup that displays the front end to the user. This clean separation gives you many advantages. For example, it makes it easy for a designer to piece of work on a website'southward visual design without the adventure of messing up the site'due south code. It also makes information technology piece of cake for you to change the pattern at a later indicate without impacting the back-terminate code.
One of Mustache'due south big plus points is that is logic-less, which means it keeps your templates very neat and tidy. There are no messy if ... so or looping constructs embedded inside a Mustache template; it's all just markup and elementary Mustache tags. All the logic is hidden abroad within your data objects (and the lawmaking that creates or fetches them).
Another reward of Mustache is that you lot're not tied to any detail language. Mustache processors are available in many languages, including JavaScript, PHP, Perl, Cherry-red, Python, Java and lots more.
You tin can use Mustache for practically any kind of template, including config files and fifty-fifty source code. Still, this article concentrates on using Mustache to build HTML templates, which is a very popular use of the system.
Mustache is used past a lot of pop websites and web apps, including Twitter and OMGPOP (maker of the ever-popular Draw Something game). Here'south a listing of sites that use Mustache.js, the JavaScript version of Mustache.
A basic Mustache example
What does a Mustache template look like? Here'southward a elementary example:
<h4>Product Info: {{name}}</h4> <ul> <li>Production: {{name}}</li> <li>Colour: {{colour}}</li> <li>Price: ${{price}}</li> </ul> Equally yous can see, this template is essentially HTML mixed with a few special Mustache tags. A Mustache tag begins with two opening braces ({{) and ends with two closing braces (}}).
Every bit you might have guessed, the {{ and }} delimiters are where Mustache gets its name from!
Inside each tag is the proper name of a variable (in this case, name, colour, and price). When Mustache processes the template, it replaces each variable name with an actual value.
But where does Mustache get the values for the variables in the template? The reply is that, when you laissez passer the template to the Mustache processor, y'all also laissez passer an object or hash containing the variable names and their associated values:
{ "proper noun": "SuperWidget", "color": "Green", "cost": "19.99" } The exact format of the object or hash depends on the linguistic communication you're using. The above example is a JavaScript (or JSON) object. But substantially you pass Mustache a listing of proper noun/value pairs.
When you pass the template and object to the Mustache processor, it combines the two and returns the final HTML, with the variable names replaced by their values:
<h4>Product Info: SuperWidget</h4> <ul> <li>Production: SuperWidget</li> <li>Colour: Light-green</li> <li>Price: $xix.99</li> </ul>
Installing Mustache
The Mustache processor is available in a wide range of languages. As a general rule, you install Mustache like this:
- Visit the GitHub folio for your chosen language (for case, JavaScript or PHP).
- Click the push to download the repository Nix file.
- Unzip the downloaded file, and move the resulting folder to your website.
- Include the relevant library file (such as
mustache.jsorMustache.php) in your web pages or server-side scripts.
There are some subtle differences betwixt the Mustache implementations for different languages. Brand sure you read the documentation specific to the Mustache processor you're using.
Running the Mustache processor
The syntax for calling the Mustache processor depends on the language you are using. Essentially though, you telephone call the Mustache grade's or object'south return() method, passing in the template string followed by the data object. The processor then combines the template with the data object to produce the final markup string, which it returns.
Here are some examples:
JavaScript:
output = Mustache.render( template, information );
PHP:
$chiliad = new Mustache; $output = $thou->render( $template, $data );
Perl:
use Template::Mustache; $output = Template::Mustache->return( $template, $data );
A Mustache demo page
Allow's get going with a uncomplicated demo page that shows Mustache in action. We'll use mustache.js — the JavaScript implementation of Mustache — so that we tin can run the demo straight in the browser, without needing to write any server-side code.
The JavaScript version of Mustache is very handy for Ajax-driven web apps. Your app tin pull JSON data from the server using Ajax, then combine the data with a Mustache template to create the last markup for displaying in the page. You'll acquire how to exercise this in the complete example at the end of the tutorial.
Grab mustache.js
To start building the demo page, you lot start need to install the JavaScript Mustache processor:
- Create a folder somewhere on your computer
- Download and unzip the JavaScript Mustache processor
- Copy the resulting
mustache.jsfile into your folder
The HTML page
Here'due south the demo page — save it as demo.html in the aforementioned folder as your mustache.js file:
<!doctype html> <html> <caput> <title>A Simple Mustache Demo</title> <meta charset="utf-eight"> <link rel="stylesheet" href="style.css" /> <script type="text/javascript" src="http://lawmaking.jquery.com/jquery-1.7.one.min.js"></script> <script type="text/javascript" src="mustache.js"></script> <script type="text/javascript" src="mustache-demos.js"></script> </head> <body> <h1>A Simple Mustache Demo</h1> <div id="wrap"> <div form="template"> <h3>Mustache Template:</h3> <textarea id="template"> <h4>Product Info: {{name}}</h4> <ul> <li>Product: {{proper name}}</li> <li>Color: {{color}}</li> <li>Price: ${{price}}</li> </ul> </textarea> </div> <div class="data"> <h3>Data Object:</h3> <textarea id="data"> var information = { "name": "SuperWidget", "colour": "Greenish", "cost": "19.99" } </textarea> </div> <div class="process"><button onclick="process()">Process Template</push button></div> <div class="html"> <h3>HTML Result:</h3> <textarea id="html"> </textarea> </div> <div class="result"> <h3>How Information technology Looks:</h3> <div id="outcome"> </div> </div> </div> </body> </html> This folio contains the following elements:
- A
fashion.cssinclude
This contains the CSS to display the demo folio. Nosotros'll create this file shortly. - Three JavaScript includes
We've included jQuery, themustache.jslibrary file, and amustache-demos.jsJavaScript file (which nosotros'll create in a moment). - A
textareawith anidof"template"
This contains the Mustache template that we desire to use. Notice that the template is mainly HTML markup, with a few Mustache tags, indicated past the{{and}}delimiters. - A
textareawith anidof"data"
This contains JavaScript code that creates an object variable calleddata, with three properties:"proper noun", with a value of"SuperWidget";"color", with a value of"Green"; and"price", with a value of"19.99". - A
buttonwith anidof"process"
When clicked, this push button calls a JavaScript function,procedure(), which runs the Mustache processor to produce the finished HTML. Nosotros'll create this function in a moment. - A
textareawith anidof"html"
This will contain the finished HTML generated past the Mustache processor, displayed as source markup. - A
divwith anidof"consequence"
This will contain the finished HTML generated by the Mustache processor and rendered by the browser, so that you can see how the ends result looks in the page.
The manner sheet
Here's the style sheet for the page — salve it as style.css in the same folder as demo.html:
body { font-family: "Georgia", serif; line-acme: 1.8em; color: #333; } #wrap { width: 57em; } textarea, .result div { font-size: .8em; width: 29em; height: 15em; margin: 1em 2em 2em 2em; padding: 1em; } textarea { font-family: Courier, stock-still; } .template, .html, .data, .result { float: left; } .result div { border: 1px solid #333; } h3 { display block; margin: 2em 0 0 ane.5em; } .procedure { display: block; clear: both; margin: 1em 0; width: 56em; text-align: center; } push { font-size: 1.5em; margin-top: 1em; } This CSS aligns the various elements in the demo folio — including the textareas, the #result div, and the #process push button — and styles them.
The JavaScript
Finally, here's the JavaScript code for the demo page — salve it every bit mustache-demos.js in the aforementioned folder as demo.html:
part process() { var template, data, html; template = $('#template').val(); eval( $('#data').val() ); html = Mustache.render( template, data ); $('#html').text( html ); $('#result').html( html ); } This function, process(), runs when the user presses the button in the page. The function:
- Extracts the template code stored in the
#templatetextarea, and stores it in the variabletemplate. - Calls
eval()on the contents of the#datatextarea, which creates thedataobject. - Calls
Mustache.return(), passing in the Mustache template stored intemplate, as well equally the data object stored indata. This generates the finished markup, which the code then stores in thehtmlvariable. - Inserts the markup stored in
htmlinto the#htmltextarea, every bit well as the#consequencediv, so that the markup tin be both viewed by the user and rendered by the browser.
Endeavor it out!
To try out the demo, open up demo.html in your browser, or printing the push button below:
You'll see 4 boxes in the folio. The box and the box are filled with the template lawmaking and the JavaScript lawmaking to generate the information object. The and boxes are initially blank.
Now press the button. This runs the Mustache processor, passing in the template and the data object. The resulting markup then appears in the box, and is rendered in the box:

The demo page in action. The code in the and boxes combine to produce the lawmaking in the box. The box shows how the HTML renders.
Try editing the contents of the and boxes, then pressing the button again to see the results. This is a corking way to play with Mustache and see what it can do.
Delving deeper into variables
Then far y'all've learned how to create a Mustache variable by placing the variable name inside a Mustache tag, and so creating a property with the same name inside your information object.
Let'south look at some more features of Mustache variables. In this section you'll explore expressions and functions; how to access object properties and methods within templates; how Mustache handles missing variables; and how Mustache HTML-escapes certain characters inside variable values.
Expressions and functions
With most languages, you're not limited to using literal values in your Mustache data objects. You lot can also use expressions and functions as values. This means your object tin can contain properties such equally:
"price": parseFloat(netPrice+tax).toFixed(2)
…or:
"price": calcPrice
(where calcPrice() is a function). Mustache and then replaces the variable tag with the effect of the expression, or the return value of the function, in the output.
I notable exception to this dominion is JSON, which doesn't permit expressions equally holding values.
Accessing object properties and methods
Your information object can also contain other objects — for example:
{ "name": "SuperWidget", "colour": "Light-green", "toll": { "regular": "19.99", "discount": "14.99" } } To admission a property or method of an object from within your Mustache template, you lot can use the dot (.) notation, like this:
<h4>Production Info: {{name}}</h4> <ul> <li>Product: {{name}}</li> <li>Colour: {{colour}}</li> <li>Regular Price: ${{price.regular}}</li> <li>Discount Toll: ${{toll.discount}}</li> </ul> Combining the above object and template produces the following output:
<h4>Production Info: SuperWidget</h4> <ul> <li>Product: SuperWidget</li> <li>Colour: Green</li> <li>Regular Cost: $xix.99</li> <li>Disbelieve Toll: $14.99</li> </ul>
Missing variables
If yous use a variable proper noun in your template that doesn't appear in the corresponding information object, Mustache only replaces the tag with an empty string. For instance, this Mustache template:
Hello, {{first}} {{last}}! when combined with this data object:
{ "first": "John", } produces this result:
Hello, John !
HTML escaping
Mustache automatically replaces certain HTML characters, such every bit < and >, with their equivalent HTML entities, such as < and >. If you don't want Mustache to HTML-escape a value, put triple braces effectually the variable name instead of double braces, like this:
{{{name}}} Alternatively, you can place an ampersand later on the opening double brace, like this:
{{&name}} A quick demo
Press the button below to encounter expressions, functions, accessing object properties, missing variables, and HTML escaping in action:
Working with sections
Sections allow y'all add more ability to your templates. Using sections, you tin can display a clamper of markup only if a certain condition is truthful (or imitation). You lot can likewise create repeating sections, which let you display lists and tables of data.
The bones syntax for a section looks similar this:
{{#sectionName}} (more than markup in here) {{/sectionName}} Conditional sections
A conditional department is a block of markup that is displayed just if a certain condition is true. Here'south an example.
Say your template looks like this:
{{#inStock}} <li><a href="#">Buy Now!</a></li> {{/inStock}} If your data object looks like this:
{ "inStock": true } …then the output volition look like this:
<li><a href="#">Purchase Now!</a></li>
On the other paw, if your data object looks similar this:
{ "inStock": false } Or like this:
{ } …then cipher will be output.
Inverted sections
Inverted sections are the opposite of conditional sections. With an inverted department, the section's content is only output if the department's variable is fake.
You create an inverted department by replacing the "#" character with a "^" graphic symbol. For example:
{{^inStock}} <li>Deplorable, out of stock.</li> {{/inStock}} The li element in the above example is only output if the value of the inStock variable is false.
To try out conditional sections and inverted sections, press the push button beneath:
Printing the button. Since the value of inStock is true, the "Buy Now!" link is displayed. Now try changing inStock to false in the data object:
"inStock": simulated
Now when you press the push, the "Sad, out of stock" message is displayed instead.
Repeating sections
Repeating sections are handy when you want to display a list or tabular array of related data in the page. You lot create a repeating section like this:
- Add a section ( for example,
{{#mySection}} ... {{/mySection}}) to your Mustache template. - Within the section, place the markup and any variable tags that yous desire to display for each particular in the listing.
- Add a listing (or array) property to your data object. Give the property the aforementioned proper name every bit the section (for instance,
mySection). - Each item in the listing should be an object containing the properties corresponding to the variable tags you added in Step two.
The Mustache processor then loops through the objects in the list. For each object, it replaces the variable tags in the section with the backdrop of the object, and outputs the section's markup.
Here'south an instance. First, the Mustache template:
<ul> {{#production}} <li>{{proper noun}}: ${{toll}}</li> {{/product}} </ul> Next, the data object:
{ "product": [ { "proper name": "SuperWidget", "price": "19.99" }, { "proper noun": "WonderWidget", "price": "24.99" }, { "proper name": "MegaWidget", "price": "29.99" } ] } And finally, the resulting output:
<ul> <li>SuperWidget: $xix.99</li> <li>WonderWidget: $24.99</li> <li>MegaWidget: $29.99</li> </ul>
You tin can try out this example by pressing the button beneath:
Adding comments in Mustache
To insert a annotate in a Mustache template, apply the following syntax:
{{! this is a annotate }} The whole annotate tag is ignored past the Mustache processor.
Including Mustache templates with partials
Partials allow you lot to include one Mustache template inside another. This lets you keep your templates modular and organized.
In the JavaScript version of Mustache, you lot create an object containing all your partials:
var partials = { myPartial: "templateString", anotherPartial: "templateString" ... }; And then, to insert a fractional at a given point in a template, you use the syntax:
{{>partialName}} So to include the partial called "myPartial", you'd write:
{{>myPartial}} Yous can also include a partial within some other partial, which lets yous make nested includes.
Then, when yous run the Mustache processor, you pass your partials object equally the 3rd argument, like this:
html = Mustache.return( template, data, partials );
Hither's an example of partials in action. First, we'll create a couple of partials, productInfo and buyLink:
var partials = { productInfo: " <ul> <li>Proper noun: {{name}}</li> <li>Color: {{color}}</li> <li>Price: ${{toll}}</li> {{>buyLink}} </ul> ", buyLink: " {{#inStock}} <li><a href='#'>Buy Now!</a></li> {{/inStock}} {{^inStock}} <li>Sorry, out of stock.</li> {{/inStock}} " }; productInfo displays a product'south name, colour and cost, Information technology likewise includes the buyLink partial, which displays the "Purchase Now!" link (or the "Deplorable, out of stock" message if the production is out of stock).
Now let'due south create our template:
var template = "<h3>Production: {{name}}</h3> {{>productInfo}}"; This template displays the product proper name inside an h3 chemical element, and then includes the productInfo partial to display the product info.
Hither's the data object that we'll utilize for our product information:
var data = { "proper name": "SuperWidget", "color": "Green", "toll": "xix.99", "inStock": true } Finally, nosotros call the Mustache render() method to create the concluding markup:
html = Mustache.render( template, data, partials ); alert( html );
This displays the following alert box:
<h3>Product: SuperWidget</h3> <ul> <li>Name: SuperWidget</li> <li>Color: Green</li> <li>Price: $nineteen.99</li> <li><a href='#'>Purchase At present!</a></li> </ul>
Bringing it all together

Let'due south build a complete JavaScript demo that shows off some of Mustache'south great features. We'll create a uncomplicated product listing page with a Become Products button. When the user clicks the button, the JavaScript code uses Ajax to fetch the product data from the server, then uses a Mustache template to brandish the product information in an HTML table.
The HTML page
First, create the main page for the product list demo. Save the post-obit code equally productList.html in a binder in your website. Likewise, copy the mustache.js and way.css files that you used earlier in the tutorial into the aforementioned folder.
<!doctype html> <html> <head> <title>Consummate Mustache Demo: Product List</title> <meta charset="utf-8"> <link rel="stylesheet" href="style.css" /> <script type="text/javascript" src="http://code.jquery.com/jquery-1.7.1.min.js"></script> <script type="text/javascript" src="mustache.js"></script> <script type="text/javascript"> var template, data, html; var gotTemplate, gotData; function getProducts() { gotTemplate = gotData = false; $.get( "productListTemplate.mustache", null, function( ajaxData ) { template = ajaxData; gotTemplate = true; if ( gotData ) processTemplate(); } ); $.getJSON( "products.txt", nothing, function( ajaxData ) { information = ajaxData; gotData = true; if ( gotTemplate ) processTemplate(); } ); } function processTemplate() { html = Mustache.return( template, data ); $('#productList').html( html ); } </script> <style> table { width: 100%; edge-spacing: 1px; border: none; } th { text-align: left; groundwork-colour: #EFEFD7; color: #000000; font-weight: assuming; padding: 4px; } td { text-align: left; background-color: #F7F7E6; color: #000000; font-weight: normal; padding: 4px; } button { margin-bottom: 20px; } </style> </caput> <trunk> <h1>Consummate Mustache Demo: Product List</h1> <button onclick="getProducts()">Get Products</button> <div id="productList"> </div> </body> </html> The folio'southward body contains:
- A heading
- A push button that, when pressed, calls the JavaScript function
getProducts(), and - An empty
#productListdivthat volition contain the products table.
The page also contains the JavaScript to fetch and display the product list. First the JavaScript sets up some variables:
-
template,dataandhtmlwill hold the Mustache template, the data object, and the final product list HTML respectively. -
gotTemplateandgotDatawill exist used to track when the JavaScript has finished fetching the Mustache template and the product data respectively. When both take been fetched, the list tin exist displayed.
The getProducts() function runs when the user presses the button. Information technology makes two calls to jQuery Ajax methods in order to retrieve two files from the server:
-
productListTemplate.mustache
The function fetches this file using the jQuerygo()method. This is the Mustache template file for the products list; we'll create this file in a moment. -
products.txt
This file is fetched using the jQuerygetJSON()method. This method works likego(), just is specifically designed for retrieving JSON data, which information technology so parses and turns into a JavaScript object.products.txtcontains the product information in JSON format. Again, nosotros'll create this in a minute.
With both Ajax requests, the code passes in an bearding callback function that runs in one case the request completes. Each office does the following:
- Information technology stores the returned information in the appropriate variable (
templateordata). - It set the advisable tracking variable to
true(gotTemplateorgotData). - If both tracking variables have been set to
true, it callsprocessTemplate()to display the production listing.
If you're new to Ajax programming or jQuery, bank check out Ajax with jQuery: A Beginner's Guide.
Finally, the processTemplate() function calls Mustache.render() to create the product listing markup, passing in the Mustache template stored in template, and the information object stored in data. It stores the markup in the html variable, which it then passes to jQuery'south html() method to insert the markup into the #productList div, displaying the tabular array to the user.
The Mustache template
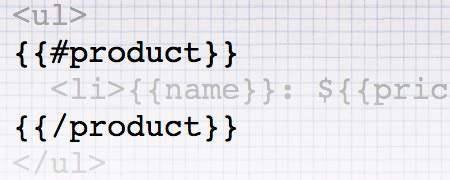
Here's the Mustache template that displays the product list table — save information technology as productListTemplate.mustache in the same folder as productList.html:
<table> <tr> <th>Product</th> <thursday>Color</th> <th>Price</thursday> <thursday>Purchase</th> </tr> {{#production}} <tr> <td>{{name}}</td> <td>{{colour}}</td> <td>${{price}}</td> {{#inStock}}<td><a href="buy.php?productId={{id}}">Buy Now!</a></td>{{/inStock}} {{^inStock}}<td>Out of Stock</td>{{/inStock}} </tr> {{/product}} </tabular array> As you tin see, the template is HTML markup interspersed with Mustache tags. The template comprises:
- A header row containing the cavalcade headers: Product, Colour, Price and Purchase.
- A
{{#production}} ... {{/product}}Mustache section. This section displays a row of product information in the table. Since theproductproperty in our data object is an array of objects (every bit you'll meet in a moment), this section will run repeatedly to display all the rows in the products table.The section contains:-
- Mustache variables to brandish the production proper noun, colour, and cost.
- Two provisional sections. The markup between
{{#inStock}} ... {{/inStock}}is displayed if theinStockvariable istruthful; information technology comprises a dummy "Purchase Now!" link that uses theidvariable to place the product. The markup between{{^inStock}} ... {{/inStock}}is displayed ifinStockisfalse; it simply displays an "Out of Stock" message.
-
The data file
The last file nosotros demand to create contains the product information in JSON format. Save the post-obit code as products.txt in the same binder as productList.html:
{ "product": [ { "id": 1, "proper name": "SuperWidget", "colour": "Green", "price": "19.99", "inStock": true }, { "id": ii, "proper noun": "WonderWidget", "colour": "White", "price": "24.99", "inStock": truthful }, { "id": iii, "proper name": "MegaWidget", "colour": "Royal", "price": "29.99", "inStock": false }, { "id": 4, "name": "HyperWidget", "colour": "Yellow", "toll": "49.99", "inStock": true } ] } This file defines a JSON object that contains a production array. The product assortment contains iv elements, each of which is an object representing a product. Each product object contains id, proper noun, colour, price and inStock properties.
In a real-world site or app, this file would likely be dynamically generated by a server-side script that pulls the data from a database, rather than stored as a static file on the server.
Try it out!
To try out the product list demo, browse to the URL for the productList.html file in your website — for example, http://mywebsite/productList.html — or printing the button below to encounter it running on our server:
Since the demo uses Ajax to fetch the template and data files, you demand to view the demo running on a web server. Opening the productList.html file directly in your browser probably won't work.
At present press the push button in the page. When yous do this, the getProducts() function runs, retrieving the productListTemplate.mustache and products.txt files from the server via Ajax. Once the files have been fetched, processTemplate() calls Mustache'south render() method to combine the Mustache template with the production data and produce the product list table, which is then displayed in the folio:
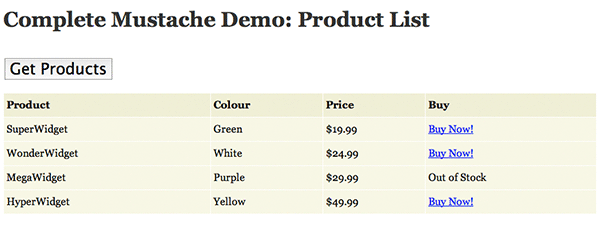
The production list demo. When you click Get Products, the JavaScript in the page fetches the Mustache template and information via Ajax, then combines them to brandish the table.
Summary
In this article y'all've explored the Mustache template system, and seen how you tin can easily use information technology to build clean, logic-less templates. Y'all've looked at:
- What Mustache is, and why it's useful.
- A basic example of a Mustache template with tags and variables, as well as a data object.
- How to install the Mustache processor on your website.
- Running the processor by calling the
return()method. - Building a simple demo page that you can use to try out various Mustache features.
- Using expressions and functions in information objects.
- How to admission object properties and methods in your Mustache templates.
- What happens when Mustache tin can't find a variable.
- How Mustache escapes HTML characters, and how to bypass escaping.
- The concept of Mustache sections, including provisional sections, inverted sections, and repeating sections (loops).
- How to add comments in Mustache templates.
- Including ane Mustache template inside some other by using partials.
- A consummate case that uses JavaScript, jQuery, Ajax and Mustache to build a simple production list page.
At that place are a few more Mustache features worth checking out, including lambdas (which allow y'all manipulate un-parsed sections of Mustache templates) and the power to change the default Mustache delimiters, {{ and }}, to something else. To notice out more than, take a look at the Mustache spec.
Have fun!
[Photo credit: thos003]

How To Link Files In Mustache Template,
Source: https://www.elated.com/easy-html-templates-with-mustache/
Posted by: yoderfiew1977.blogspot.com
0 Response to "How To Link Files In Mustache Template"
Post a Comment